ClamAV 是一款开源的防病毒引擎,专为检测恶意软件、病毒、木马、蠕虫等威胁而设计,广泛应用于邮件网关、文件扫描和端点安全等领域。本文将详细介绍如何在 Windows 系统本地部署可视化 ClamAV 并结合路由侠实现外网访问本地部署的 ClamAV 。
第一步,本地部署安装 ClamAV
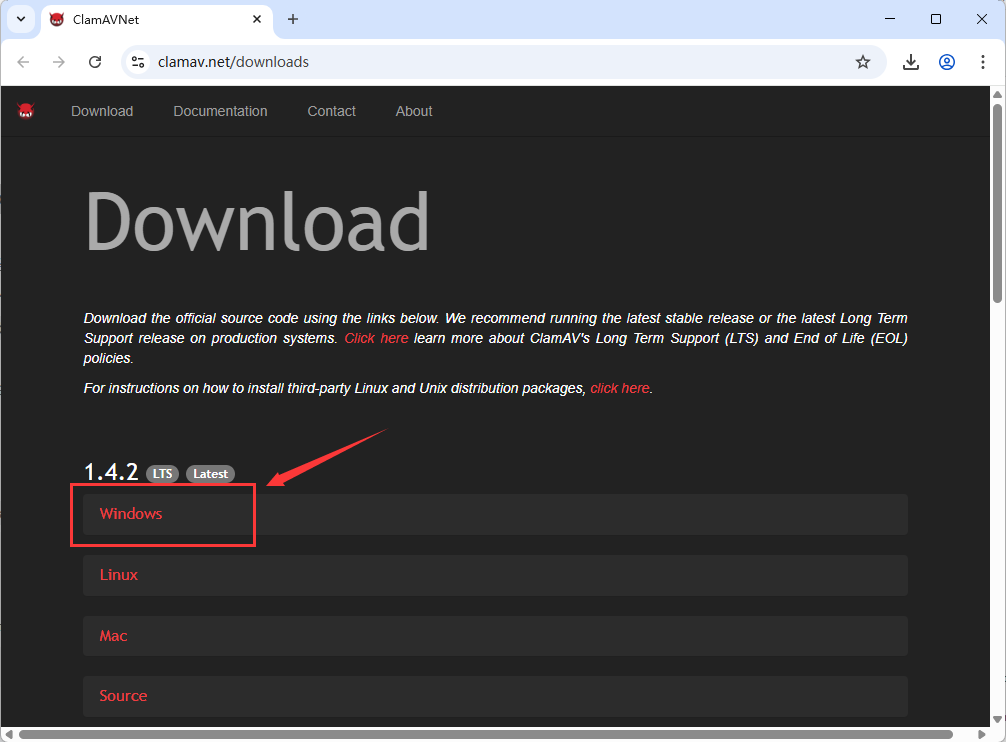
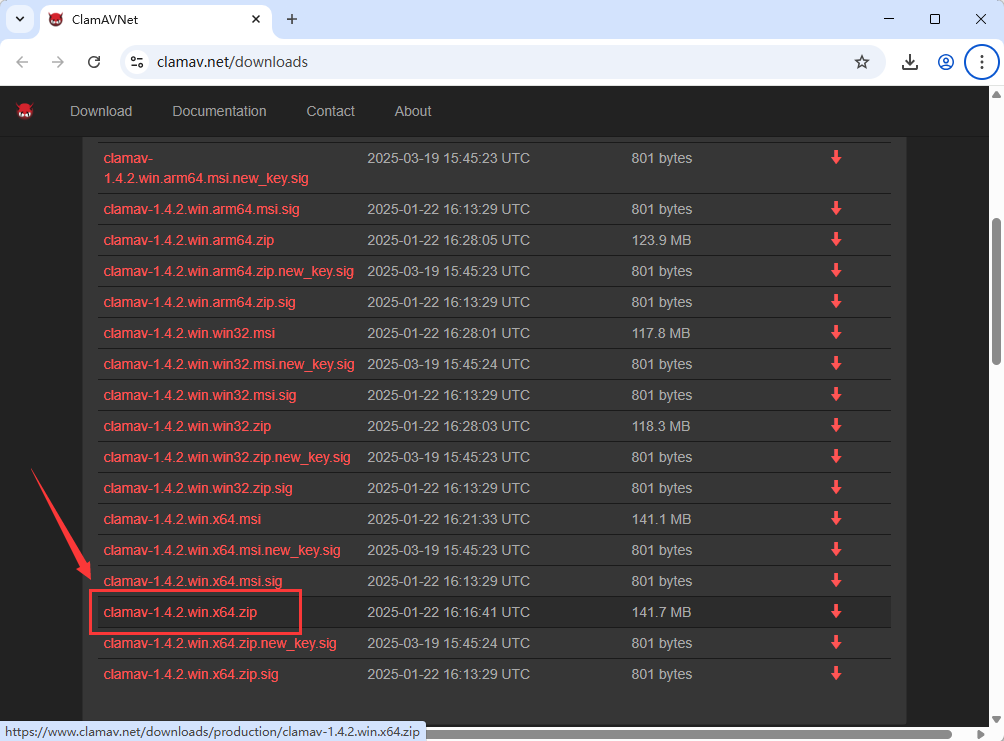
1,本教程操作环境为 Windows11 系统,访问 ClamAV 官网下载页: https://www.clamav.net/downloads ,选择最新版本的“ Windows ”,本教程选择“ clamav-1.4.2.win.x64.zip ”为例。
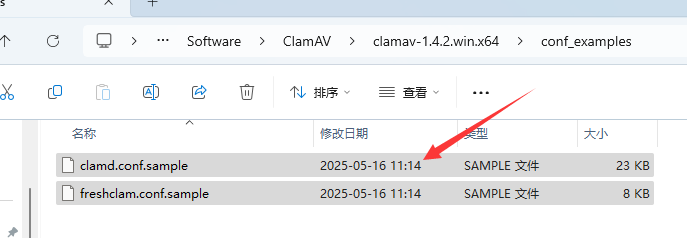
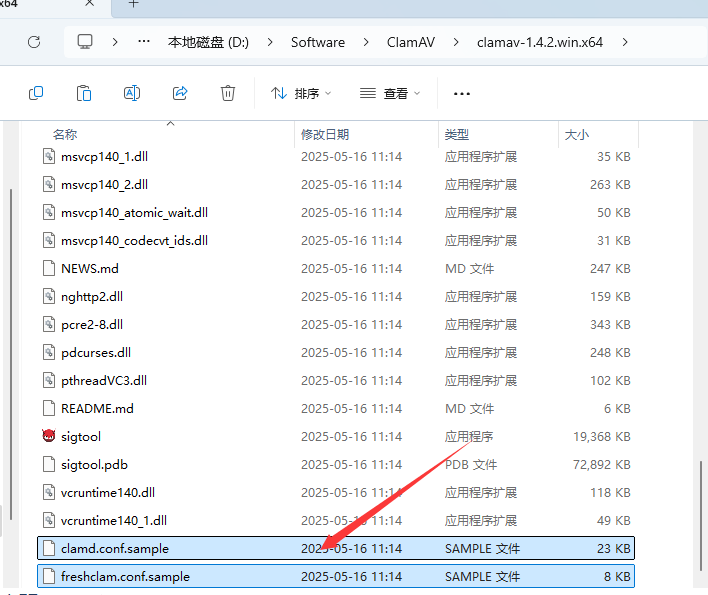
2,将压缩包解压到无空格路径,进入解压目录,复制 conf_examples 下的 clamd.conf.sample 和 freshclam.conf.sample 到主目录,分别重命名为 clamd.conf 和 freshclam.conf 。

3,首次运行前打开 freshclam.conf ,取消注释并修改以下行。
DatabaseMirror database.clamav.net
UpdateLogFile C:\ClamAV\logs\freshclam.log
LogFileMaxSize 2M
LogRotate yes
LogTime yes
DatabaseDirectory C:\ClamAV\db
Foreground yes
Debug yes
打开 clamd.conf ,取消注释并修改以下行。
LogFile C:\ClamAV\logs\clamd.log
LogFileMaxSize 2M
LogTime yes
LogRotate yes
Debug yes
LocalSocket C:\ClamAV\clamd.socket
TCPSocket 3310
TCPAddr 0.0.0.0
StreamMaxLength 50M
4,以管理员身份打开命令提示符,输入以下命令创建必要目录:
mkdir C:\ClamAV\logs
mkdir C:\ClamAV\db
输入以下命令导航到 ClamAV 目录:
cd C:\ClamAV
运行更新病毒数据库:
freshclam.exe
运行守护进程启动 ClamAV 服务:
clamd.exe
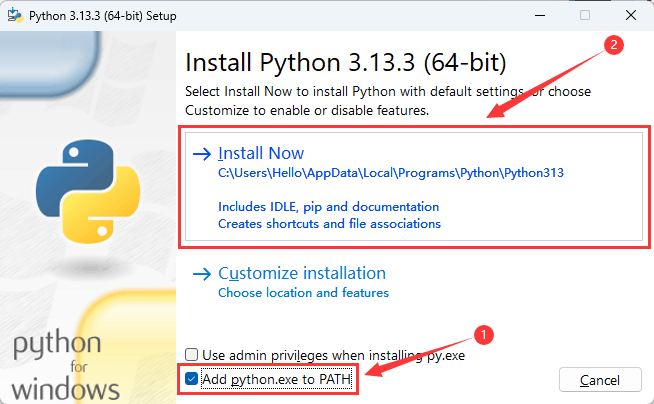
5,下载 Python 3.6 + ,点此下载,安装时勾选" Add Python to PATH "。
6,编辑 C:\ClamAV\clamav-rest\requirements.txt 文件,将内容改为:
flask>=3.1.0
pyclamd>=0.4.0
在 cmd 输入以下命令使用清华源安装。
pip install -r C:\ClamAV\clamav-rest\requirements.txt -i https://pypi.tuna.tsinghua.edu.cn/simple --trusted-host pypi.tuna.tsinghua.edu.cn
7,在 C:\ClamAV\clamav-rest 创建 templates\index.html ,在 script 中输入以下内容。
 async function scan() {
      const file = document.getElementById('fileInput').files[0];
      const formData = new FormData();
      formData.append('file', file);

      const response = await fetch('/scan', {
        method: 'POST',
        body: formData
      });
      document.getElementById('result').textContent = await response.text();
    }
同目录下创建 app.py 文件,输入以下内容。
from flask import Flask, request, jsonify,render_template, send_from_directory
import pyclamd
import socket
import os

app = Flask(__name__)
cd = pyclamd.ClamdNetworkSocket('localhost', 3310)

UPLOAD_FOLDER = 'uploads'
os.makedirs(UPLOAD_FOLDER, exist_ok=True)

@app.route('/')
def index():
    return render_template('index.html')

def check_clamd():
    try:
        sock = socket.socket(socket.AF_INET, socket.SOCK_STREAM)
        sock.settimeout(2)
        result = sock.connect_ex(('localhost', 3310))
        return result == 0
    except:
        return False

@app.route('/health')
def health():
    return jsonify({
        "flask_status": "running",
        "clamd_connected": check_clamd()
    })

@app.route('/scan',methods=['GET', 'POST'])
def scan():
    if request.method == 'POST':
        if 'file' not in request.files:
            return jsonify({"error": "No file uploaded"}), 400

        file = request.files['file']
        if file.filename == '':
            return jsonify({"error": "Empty filename"}), 400

        filepath = os.path.join(UPLOAD_FOLDER, file.filename)
        file.save(filepath)

        return _perform_scan(filepath)
    else:
        filepath = request.args.get('filepath')
        if not filepath:
            return jsonify({"error": "Missing filepath parameter"}), 400
        return _perform_scan(filepath)

def _perform_scan(filepath):
    try:
        result = cd.scan_file(filepath)
        return jsonify({
            "status": "infected" if result else "clean",
            "path": filepath,
            "result": result
        })
    except Exception as e:
        return jsonify({"error": str(e)}), 500

import atexit
import shutil

def cleanup():
    if os.path.exists(UPLOAD_FOLDER):
        shutil.rmtree(UPLOAD_FOLDER)

atexit.register(cleanup)

if __name__ == '__main__':
    app.run(host='0.0.0.0', port=5000)
输入以下命令运行 ClamAV REST API 服务:
python app.py
8,打开浏览器输入地址 http://localhost:5000 即可访问 ClamAV 进行扫描。

第二步,外网访问本地 ClamAV
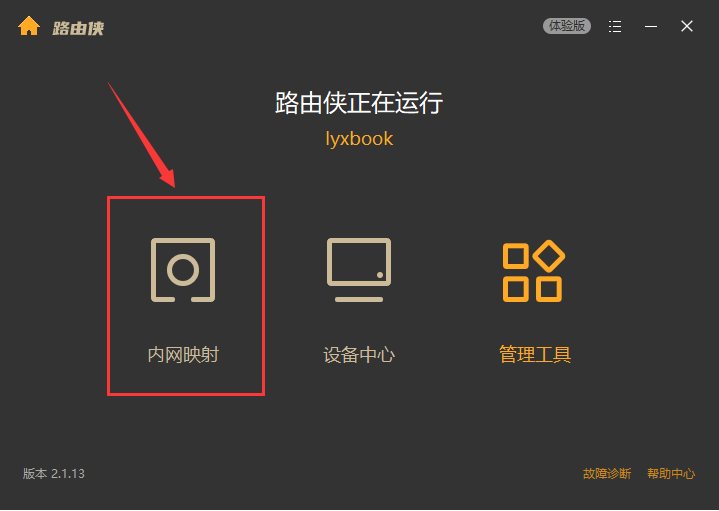
在内网的电脑上安装路由侠,点此下载
1,下载安装完成后,打开路由侠界面,点击【内网映射】。
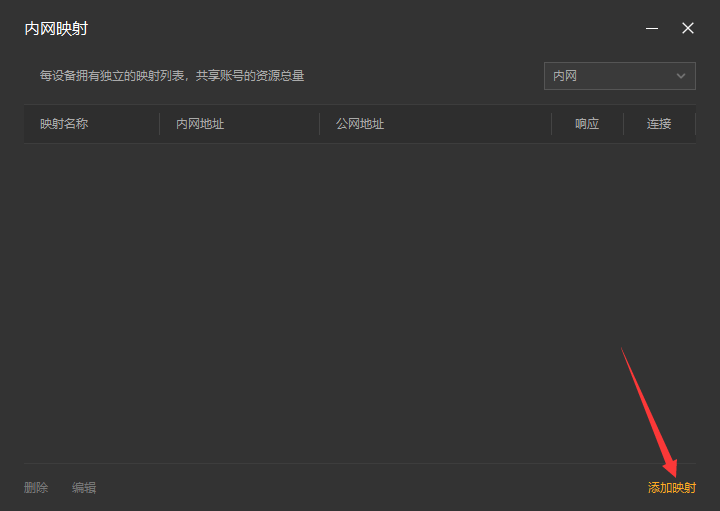
2,点击【添加映射】。
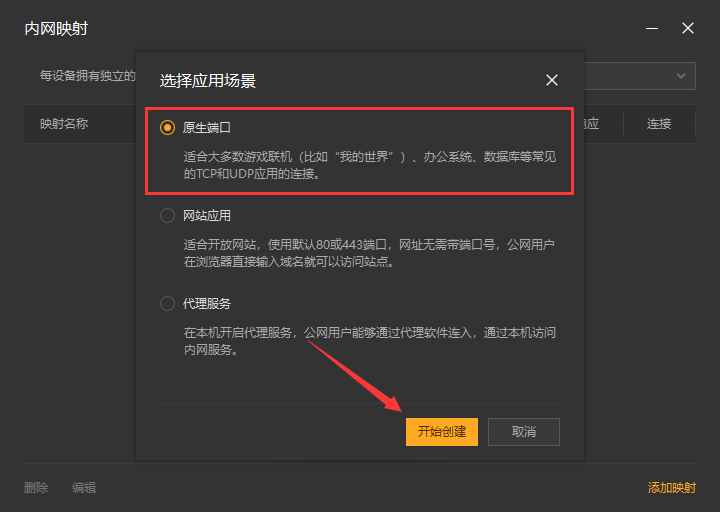
3,选择【原生端口】。
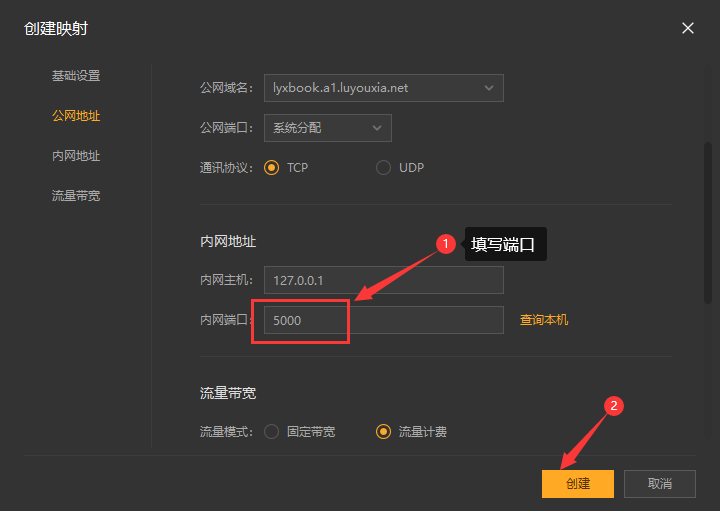
4,在内网端口填写 ClamAV 端口 5000 后点击【创建】按钮,如下图。
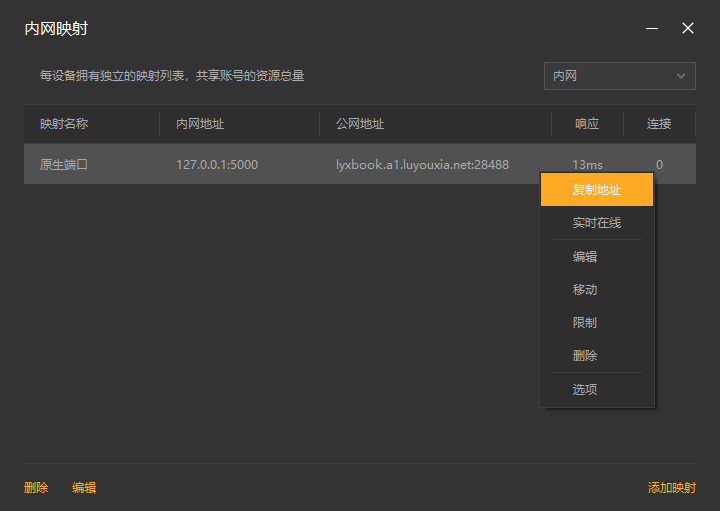
5,创建好后,就可以看到一条映射的公网地址,鼠标右键点击【复制地址】。
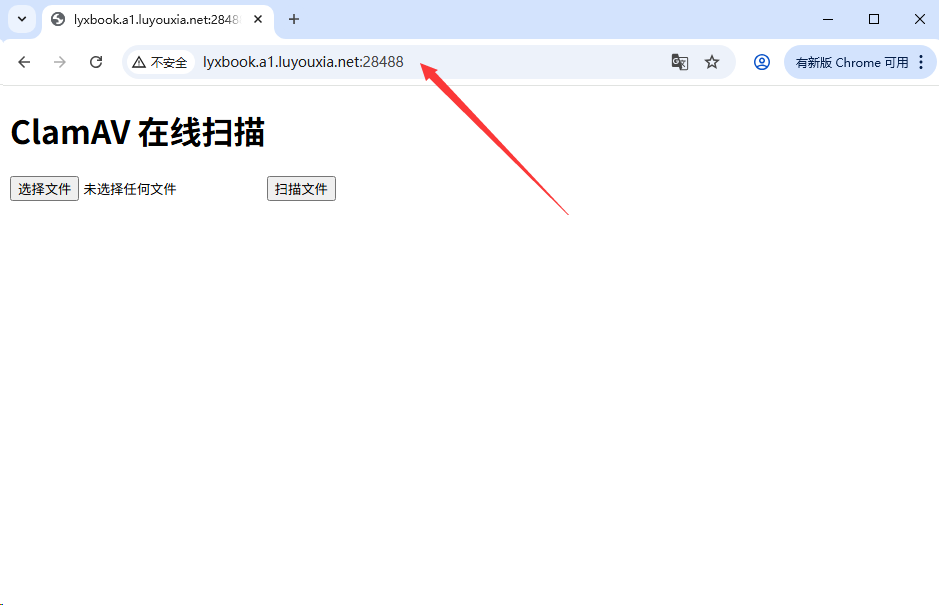
6,在外网电脑上,打开浏览器,在地址栏输入从路由侠生成的外网地址,就可以看到内网部署的 ClamAV 扫描界面了。
以上就是 Windows 系统在本地部署可视化 ClamAV 服务以及利用路由侠的内网穿透平台实现外网访问本地部署的 ClamAV 的全部教程了,如果想要对路由侠有更多的了解,可以进官网详细了解,路由侠官网地址:www.luyouxia.com